
This post may contain affiliate links. Please read our disclosure policy.
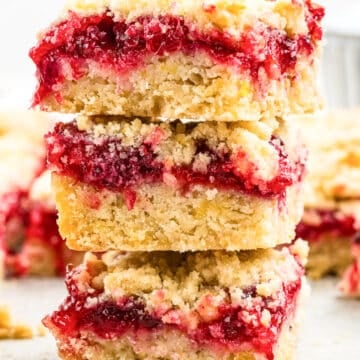
Fudgy, dense brownies are a favorite dessert, just like cream pie…which is exactly why it was a no-brainer to combine the two and make these Peanut Butter Pie Brownies!
You get the rich, moist, and oh-so chocolatey brownie base, successfully followed by a smooth, light, and fluffy peanut butter cream cheese topping.

Finally, garnish this irresistible dessert with melted chocolate bark, chopped peanuts, or chopped Reese's Pieces.
The creamy topping provides a delicate element to the dense and rich brownie base, cutting that deep sweet chocolate flavor with a more salty-sweet and slightly tangy flavor profile. It's like eating a Reese's Pieces in brownie pie form!
We love brownies in this house. These Peanut Butter Pie Brownies are some of the best Dessert Recipes as well as some of the best brownie recipes. I just love brownies, like my Butterfinger Buckeye Brownies, Cherry Cheesecake Brownies, and my Best Brownies Recipe.
Serve your peanut butter pie brownies chilled or bring them to room temperature before adding a scoop of vanilla ice cream or dollop of whipped cream to the dessert bowl.
Table of Contents
- Why You’ll Love This Recipe
- Why This Recipe Works
- How To Make Peanut Butter Pie Brownies
- Ingredient Notes
- How To Cut And Decorate The Peanut Butter Brownies
- How To Serve Peanut Butter Pie Brownies
- Pro Recipe Tips
- Variations
- What To Serve With Peanut Butter Pie Brownies
- Frequently Asked Questions (FAQs)
- More Recipes You’ll Love
- Recipe
- Reviews

Why You’ll Love This Recipe
- Simplicity: These peanut butter pie brownies are quite straightforward and simple to assemble. I mean, it's literally a brownie with a cream cheese topping!
- Reasonable time to make: Apart from the chilling time, you can whip up 15 of these homemade peanut butter pie brownies in just 1 hour! That's pretty good considering how decadent these brownies are.
- Make ahead: You could prepare your brownie base a day or two ahead of time till ready to assemble with the cream cheese topping to serve.
- Versatile: Adapt your peanut butter pie brownies with additional ingredient add-ins or ingredient swaps to better suit your dessert preferences.
Why This Recipe Works
- Tried and True. This is a tried and tested dessert recipe, allowing me to guide you through simple and clear recipe instructions with corresponding in-process images so that there's zero guesswork on your part!
- Multi-Tasking Made Easy. Most of the recipe time is dedicated to chilling these peanut butter pie brownies, which means that you can get on with other things in between the recipe steps.
- Helpfful Tips. Useful tips and frequently asked questions are added in this recipe post for further clarification, making the recipe a breeze to understand and follow.
- Variations Included. I've included a few ways that you could adapt these Peanut Butter Pie Brownies with simple recipe substitutions and suggestions.

How To Make Peanut Butter Pie Brownies
Equipment
The affiliate links below will allow you to see the product on Amazon.com. If you purchase one of the items, I will receive a very small commission on the product, which does not increase the price.
- Mixing Bowl Set – Every baker must have a good mixing bowl set. I like this set as it is durable and highly rated. The high-quality tempered glass is dishwasher, freezer, microwave and preheated oven safe. It highly rated by over 20,000 reviewers and costs under $20.
- Stand Mixer – Anyone who does a lot of baking will love this popular stand mixer. It saves time, and wear and tear on your arms. It comes in a variety of colors so you can pick your favorite color.
- Hand Mixer – For a more economical option that you can store under the counter I recommend a hand mixer. I like this one that has a case so you can easily store all its accessories together. It is highly rated by 10s of 1,000s of reviewers and is under $25.
- Baking Dish or Cake Pan – This durable cake pan is highly rated by thousands of reviewers. It includes a cover so you can take it with you to parties, potlucks, and picnics.
- Wire Rack – You’ll need a wire rack to cool the brownies. I like this simple yet highly rated stainless steel set as it is oven safe and dishwasher safe and under $20.
- Sharp Knife – You’ll need a sharp knife to cut the brownies. Here is a small sharp knife set that is highly rated at a reasonable price.
- Cutting Board – This popular 3-piece cutting board set is non-slip with handles and dishwasher safe, and is very economical so it will fit most budgets.
Ingredient Notes
Below, I discuss the ingredients and possible substitutions if you don't have a specific ingredient. However, if you are looking for the specific measurements of each ingredient, scroll down to the bottom of this article, just above the comments, for the printable recipe card, which includes all the ingredients and the specific amounts of each one.

- Unsalted butter – if you opt to use salted butter then simply omit the sea salt listed in the recipe ingredients.
- Semi-sweet baking bar – this is added to the butter and melted down for incorporation into the brownie batter while the semi-sweet chocolate chips are merely mixed into the batter afterwards for additional texture.
- All-purpose flour – if you need these brownies to be gluten-free then I suggest using something like King Arthur gluten-free flour which is a convenient measure-for-measure substitution.
- Granulated sugar
- Light brown sugar – make sure to pack this sugar firmly when measuring it for incorporation.
- Cocoa powder – use the unsweetened option.
- Baking soda
- Fine sea salt – A small amount helps to elevate the chocolate flavor in these peanut butter pie brownies.
- Eggs – it's also best to bring the eggs to room temperature when baking.
- Semi-sweet chocolate chips – these are not to be melted down like the chopped chocolate bar but rather folded into the batter prior to baking. They're a lovely optional addition to the brownie batter that I enjoy but you can omit these if you like.
- Cream cheese – Allow the cream cheese to soften before use. This will ensure a smoother consistency to the topping.
- Powdered sugar – make sure to measure your powdered sugar as too much can cause an overly sweet topping and also affect the overall texture since it can dry out the other topping ingredients incorporated.
- Creamy peanut butter – it's best to only use regular peanut butter instead of natural since the oils often separate in natural nut butters. I also recommend using a smooth peanut butter for a smooth creamy topping.
- Vanilla extract – I use high quality vanilla extract in all my sweet treats for best flavor.
- Whipped topping – you could use Cool Whip or homemade whipped topping instead.
- Chocolate bark – this is completely optional but a lovely addition if you would like to drizzle some melted chocolate over the brownies for added visual effect. You won't need to add any oil when melting chocolate bark like you would if using chocolate chips.
Easy Instructions With Photos
- Preheat the oven to 350°F. Line a 9×13 with foil and spray with cooking spray, set aside.
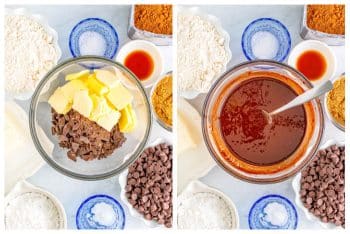
- In a medium-sized bowl add the butter and chopped chocolate. Microwave for 30 seconds, stir. Microwave for another 30 seconds, stir. Start microwaving at 15-second intervals stirring in between until the mixture is melted. Stir in the vanilla and set aside.

How To Make Brownie Layer
- In the bowl of a stand mixer with the paddle attachment add the flour, sugar, brown sugar, cocoa powder, baking soda, and salt.
- Stir to combine.
- At low speed add in the eggs one at a time until mixed in. Turn the mixer on medium and let it mix for 2 minutes, scrape down the sides.
- Turn the mixer on low and slowly stream in the melted chocolate mixture until combined. Add the chocolate chips and just mix them in so they are incorporated through the batter.
- This mixture will be very thick.
- Press the brownie batter into the bottom of the baking dish, I find using my hands to spread it out easiest. Bake for 25-30 minutes until the top is set, no longer glossy, and the edges slightly puff up. You can take an internal temperature, if the brownies are 165°F they are done.

- Let cool on a wire rack completely.

How To Make Peanut Butter Layer
- Once the brownies are cooled, make the topping by placing the cream cheese in a large bowl.
- With an electric hand mixer beat it until smooth. Add the powdered sugar, and mix until smooth.
- Add the peanut butter and vanilla.
- Mix until smooth.
- Add the whipped topping.
- Fold in the whipped topping until smooth and there are no streaks left, this can take a couple of minutes.

- Smooth the peanut butter mixture on top of the brownies. Cover and place in the fridge for at least 4 hours or overnight.
- Use the foil to help lift the brownies out of the pan.

How To Cut And Decorate The Peanut Butter Brownies
- Using a sharp knife, cut into 15 evenly sized bars.

- Drizzle with optional melted chocolate bark.

How To Serve Peanut Butter Pie Brownies
Serve as is or with your favorite toppings such as whipped cream, chopped peanuts, chocolate chips, or Reese's pieces!

Pro Recipe Tips
- Peanut Butter Tips. I've found that regular peanut butter works far better for the peanut butter pie brownie topping than natural peanut butter. The oil in natural peanut butter separates unlike in regular commercial peanut butter which could have a negative impact on this dessert's creamy topping.
- Cooling. Allow your baked brownie base to cool before adding the cream cheese peanut butter topping otherwise your topping may melt somewhat or cause the cream elements to split.
- Adjust size. While I've used a 9×13 inch baking tray, you could use a smaller baking tray but then you will end up with slightly thicker brownies and the brownie base may need some additional baking time too as a result.
- Safety First. The best way to discover if your brownie base has baked sufficiently is to use a food thermometer. Insert the thermometer into the center of the brownie base – it should read 165℉ for it to have been cooked through.
- Chill. While these brownies need to be kept refrigerated due to the cream cheese topping, if they are super cold then the brownie base will harden. If that happens, allow your brownies to sit at room temperature for 5-10 minutes before you serve them.

Variations
While I love dark chocolate combined with peanut butter, one obvious recipe variation that comes to mind for this recipe is to make peanut butter pie blondies instead of brownies!
You can easily make this adjustment by simply omitting the unsweetened cocoa powder and then making the following substitutions:
For the Brownie Base:
- Use a white chocolate baking bar instead of a semi-sweet baking bar.
- Use white chocolate chips in place of semi sweet chocolate chips.
For the Peanut Butter Cream Cheese Topping:
- Use white chocolate bark instead of chocolate bark as an optional extra and to keep within the theme of a blondie recipe, otherwise feel free to still use the chocolate bark as called for in this recipe.
Other tasty variations you could make include:
- Adding chopped peanuts to the brownie batter;
- Ditching the peanut butter altogether and using something like nutella in its place for a super decadent and chocolatey Nutella pie brownie recipe;
- Adding some finely crushed oreos into the cream cheese topping as a delicious level of crunch to this dessert.
- Including peanut butter-flavored candy (such as the much-loved Reese's Pieces) in the brownie batter to add more peanut butter flavor throughout the dessert.

What To Serve With Peanut Butter Pie Brownies
These peanut butter pie brownies are rich and decadent enough to be enjoyed as is, however, you could consider serving them with freshly whipped cream or ice cream and a chocolate sauce!
You can also get rather creative with the various garnish options when it comes to serving these brownies. Chopped peanuts, drizzled chocolate bark, or chopped Reese’s Pieces can be added!
Frequently Asked Questions (FAQs)
WHAT ARE PEANUT BUTTER PIE BROWNIES?
These peanut butter pie brownies are a mix of cream pie and brownie. While a typical cream pie recipe will use a cookie crust with a creamy filling and/or topping, this recipe uses a brownie base with a creamy peanut butter topping, baked and cut into brownie squares instead of a round pie.
HOW SHOULD I STORE PEANUT BUTTER PIE BROWNIES?
Due to the cream cheese topping, I suggest storing these peanut butter pie brownies in an airtight container in the refrigerator for 4-5 days.

You could also opt to freeze your brownies for an extended amount of time (for up to 1 month). It would be easier if you store these brownies in the baking tray used and then wrap the baking tray tightly in plastic wrap. Alternatively, if you intend storing some leftover brownies that have already been removed from the baking tray, first flash freeze them and then wrap each brownie in plastic wrap to store in an airtight container.
Thaw your frozen brownies in the refrigerator prior to serving.
CAN I USE A NATURAL PEANUT BUTTER FOR THESE BROWNIES?
Since the peanut butter is incorporated into the cream cheese topping for these brownies, I recommend that you only use regular commercial peanut butter and not natural peanut butter.
Since natural nut butters lack any stabilizer ingredients, the natural oils in the natural peanut butter separate from the butter itself. This could have an impact on the peanut butter cream cheese topping, especially after it has rested for some time.
More Recipes You’ll Love
- Peanut Butter Chocolate Chip Cookies
- Chocolate Peanut Butter No Bake Pie
- Chocolate Peanut Butter Dip
- Chocolate Pretzel Peanut Butter Bites
If you like this recipe or make this recipe, be sure to leave a comment, rate the recipe, and follow us on:
Facebook | Twitter | Pinterest | BlogLovin | Instagram
Recipe

Ingredients
- ¾ cup unsalted butter sliced into tablespoons
- 6 ounces semi-sweet baking bar chopped
- 2 teaspoons vanilla extract
- 1 & 1/2 cups all-purpose flour
- 1 cup granulated sugar
- 1 cup light brown sugar packed
- 3/4 cup unsweetened cocoa powder
- 1/2 teaspoon baking soda
- 1/2 teaspoon fine sea salt
- 3 large eggs
- 2 cups semi-sweet chocolate chips
- For the topping:
- 8 ounces cream cheese softened
- 3/4 cup powdered sugar
- 1/2 cup creamy peanut butter
- 1 teaspoon vanilla extract
- 8 ounces whipped topping
- ¼ cup melted chocolate bark optional
Instructions
- Preheat the oven to 350°F. Line a 9×13 with foil and spray with cooking spray, set aside.
 In a medium-sized bowl add the butter and chopped chocolate. Microwave for 30 seconds, stir. Microwave for another 30 seconds, stir. Start microwaving at 15-second intervals stirring in between until the mixture is melted. Stir in the vanilla and set aside.
- In the bowl of a stand mixer with the paddle attachment add the flour, sugar, brown sugar, cocoa powder, baking soda, and salt, stir to combine. At low speed add in the eggs one at a time until mixed in. Turn the mixer on medium and let it mix for 2 minutes, scrape down the sides.
- Turn the mixer on low and slowly stream in the melted chocolate mixture until combined. Add the chocolate chips and just mix them in so they are incorporated through the batter. This mixture will be very thick.
- Press the brownie batter into the bottom of the baking dish, I find using my hands to spread it out easiest. Bake for 25-30 minutes until the top is set, no longer glossy, and the edges slightly puff up. You can take an internal temperature, if the brownies are 165°F they are done.
- Let cool on a wire rack completely.
- Once the brownies are cooled, make the topping by placing the cream cheese in a large bowl. With an electric hand mixer beat it until smooth. Add the powdered sugar, and mix until smooth. Add the peanut butter and vanilla, mix until smooth. Fold in the whipped topping until smooth and there are no streaks left, this can take a couple of minutes.
- Smooth the peanut butter mixture on top of the brownies. Cover and place in the fridge for at least 4 hours or overnight.
- Use the foil to help lift the brownies out of the pan. Cut into bars and drizzle with optional melted chocolate bark. Serve as is or with your favorite toppings such as whipped cream, chopped peanuts, chocolate chips, or Reese's pieces!

Hi, I’m Michele Feuerborn, a home cook with 25+ years experience, and former AllRecipes Allstar, creating bold & easy Southern, Mexican, Tex-Mex, and Instant Pot recipes. Featured in publications like Parade and BuzzFeed. Read More…

Comments
No Comments