


This post may contain affiliate links. Please read our disclosure policy.
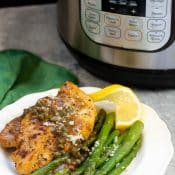
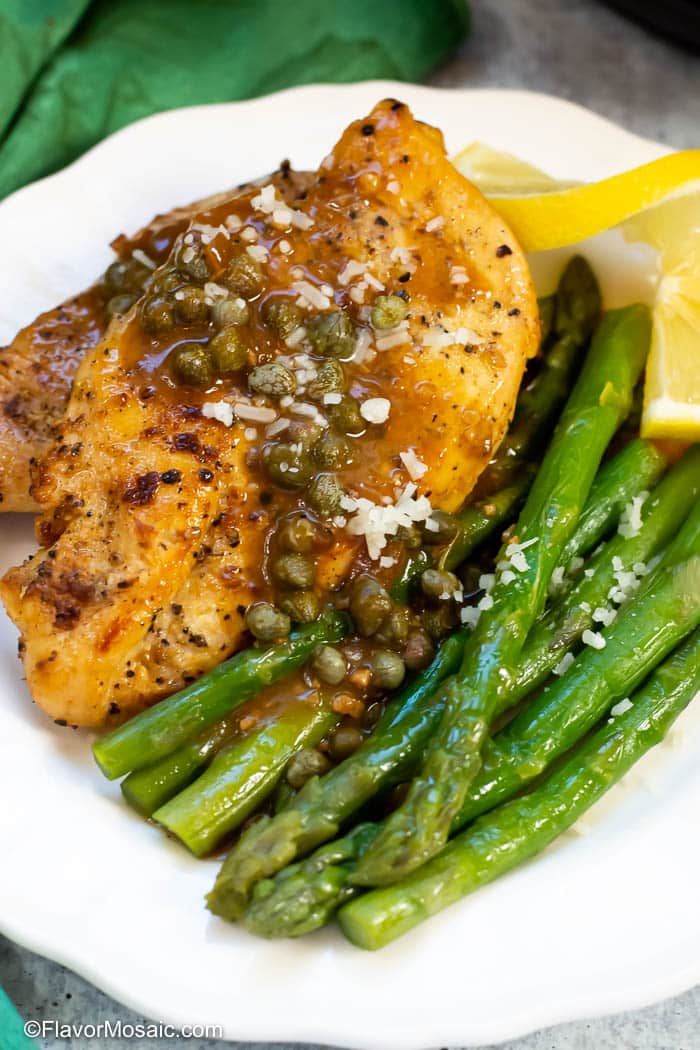
Instant Pot Chicken Piccata, with a garlic lemon caper sauce, is an easy, simple and delicious way to turn ordinary chicken breast into a gourmet meal and have dinner on the table in under 30 minutes.
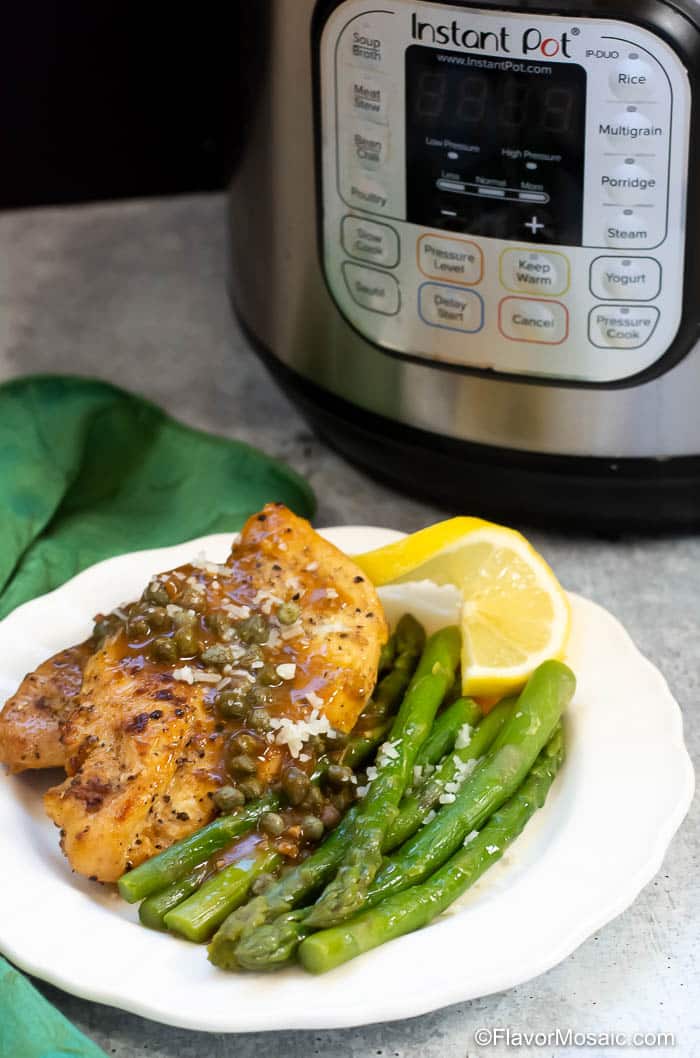
Instant Pot Chicken Piccata makes a delicious and flavorful main dish for your Spring Dinner.
Table of Contents
- What Is Chicken Piccata?
- Why Make Chicken Piccata In An Instant Pot?
- What Makes This Instant Pot Chicken Piccata Recipe Work?
- What Do I Need To Make Instant Pot Chicken Piccata
- How Do I Make Chicken Piccata?
- How Long Do I Pressure Cook Chicken Piccata?
- How To Make The Buttery Garlic Lemon Caper Sauce
- Tips For Perfect Instant Pot Chicken Piccata Every Time
- What To Serve With Chicken Piccata?
- FAQs
- More Chicken Recipes
- Recipe
- Reviews
What Is Chicken Piccata?
Chicken Piccata is a thinly sliced chicken breast prepared using an Italian method called Piccata.
What is Piccata? Piccata simply means dredging the chicken breast in flour, browning it, and serving it with a sauce made with butter, lemon, garlic, capers, and either white wine or chicken stock.
If you are looking for a traditional style Chicken Piccata prepared in a skillet on the stove, then try my Chicken Piccata recipe, prepared using the traditional method.
See below to learn about how this Chicken Piccata recipe is different from the traditional.
Why Make Chicken Piccata In An Instant Pot?
The first thing that differentiates this Chicken Piccata recipe from a traditional Italian Chicken Piccata is the cooking method. Like other Instant Pot Recipes, this recipe take advantage of the Instant Pot, the super popular programmable pressure cooker, that makes cooking so easy. Here’s why:
- Fast. The Instant Pot requires only 4 minutes of pressure cooking time, which helps you get dinner on the table fast.
- One Pot. Everything is done in one pot, including browning the chicken, cooking the chicken, and making the sauce. This means you only have one pot to clean, and makes clean up time after dinner much easier and faster.
- Moist and Juicy Chicken. Pressure cooking makes chicken, and other meats, so moist, tender, and juicy.
- Flavor. Even though it cooks quickly, the flavor of the chicken piccata tastes like you cooked it for hours. There is something about an Instant Pot that really brings out more depth of flavor in the foods.
What Makes This Instant Pot Chicken Piccata Recipe Work?
This is not the only Chicken Piccata recipe prepared in an Instant Pot, so what makes this Instant Pot Chicken Piccata recipe unique?
- No flour. Unlike most chicken piccata recipes, this one uses no flour for three reasons. First, I wanted to lighten up the recipe a little and reduce the calories. Secondly, I don’t like the texture of the breaded chicken after pressure cooking. The breading can sometime be too moist and soggy. So I eliminated that step, which has a third benefit of saving time. Also, this means that many people who are gluten free will be able to enjoy this recipe.
- More Flavor. In addition to the traditional seasonings, I add shallots, lemon pepper instead of regular pepper, and cayenne for a little more heat and depth of flavor. I also added cream and parmesan cheese to the sauce to make it more rich and creamy. However, if you want this chicken dish to be dairy free, you can leave those out those two ingredients.
- Follows Best Practices For Instant Pot Cooking. There are certain tips or best practices to ensure that your Chicken Piccata comes out perfectly every time in the Instant Pot. For example, the order in which the ingredients are added is important to avoid getting the dreaded “Burn” notice. Another one is not adding any dairy products, such as milk and cheese, until after the Instant Pot has finished pressure cooking. This avoids the milk from curdling. I see many other recipes for the Instant Pot that don’t follow these best practices and that can sometimes cause issues for home cooks. This Instant Pot Chicken Piccata recipe gives you the best chance for success.
What Do I Need To Make Instant Pot Chicken Piccata
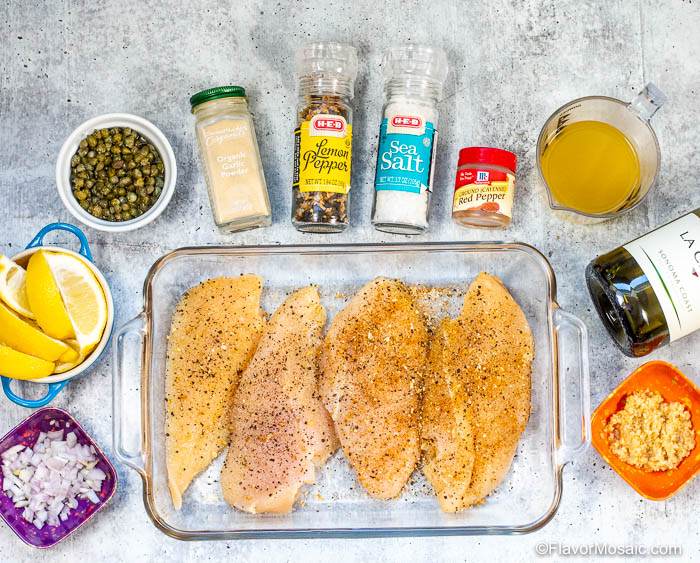
Below is a list of ingredients, and a discussion of possible substitutions, if available, that you will need to make Instant Pot Chicken Piccata. Many of these ingredients, you will find in your pantry already. For the specific amounts of each ingredient, scroll down to the bottom of this article to the printable recipe card for more details.
Equipment
- 6-quart Instant Pot Duo60 from Amazon.com (affiliate link) – This is the model Instant Pot that I use.
- Chef’s Knife from Amazon.com (affiliate link)
Ingredients And Substitutions
- Oil and butter (not included in above photo). Use an oil that has a high smoke point. This will allow it to withstand the high temperatures of sautéing and pressure cooking.
- Thin-sliced boneless, skinless chicken breasts. If you have thick chicken breasts, you will need to slice each one horizontally to make 2 thin chicken breasts instead of one thick chicken breast. This is important because thicker chicken breasts will take longer to cook and potentially double the pressure cooking time.
- Chicken stock or chicken broth. You can use chicken stock, broth, vegetable broth, or water. The important thing for Instant Pot cooking is to have a thin liquid, like broth or water, to allow the Instant Pot to come up to pressure.
- White wine (optional). Traditionally, Chicken Piccata uses white wine. However, if you prefer, use more chicken broth instead of wine.
- Freshly squeezed lemon juice. You will need the juice from one lemon, which should generate about 2 tablespoons of lemon juice.
- Minced Garlic. Garlic is a foundational flavor in this recipe. Don’t skip it.
- Chopped Shallots. While not necessarily in the traditional recipe, it adds additional flavor. However, if you don’t have it, you can skip it or add chopped onions if you like.
- Capers. These are an essential ingredient for Chicken Piccata and can’t be skipped. If you don’t already have them, make a trip to the store to get them for this recipe.
- Seasonings. You will need salt, lemon pepper, garlic powder, and cayenne, which is optional. If you don’t have lemon pepper, use regular pepper. If you don’t like any heat, leave out the cayenne. Another option for cayenne, would be crushed red pepper.
- Milk or Cream (optional). To make the sauce more creamy, you can add milk or cream after pressure cooking the chicken. However, this is optional.
- Cornstarch and water (optional to thicken sauce). Pressure cooking requires a certain amount of liquid. Sometimes, for some people, it makes the sauce thinner than they would like. In that case, you can stir together cornstarch and water and add it to the sauce to thicken the sauce.
- Parmesan Cheese (optional). I used this more as a garnish when serving, and serve a small bowl of parmesan cheese with the Chicken Piccata in case guests want to add more cheese. However, you could also add the parmesan cheese directly to the sauce after the chicken has been pressure cooked.
For the specific amounts of each ingredient, scroll down to the bottom of this blog post to the printable recipe card.
How Do I Make Chicken Piccata?
Please note that this discusses the major steps involved in preparing Instant Pot Chicken Piccata. For more detailed instructions, please scroll down to the bottom of this article, just above the comments, for the printable recipe card.
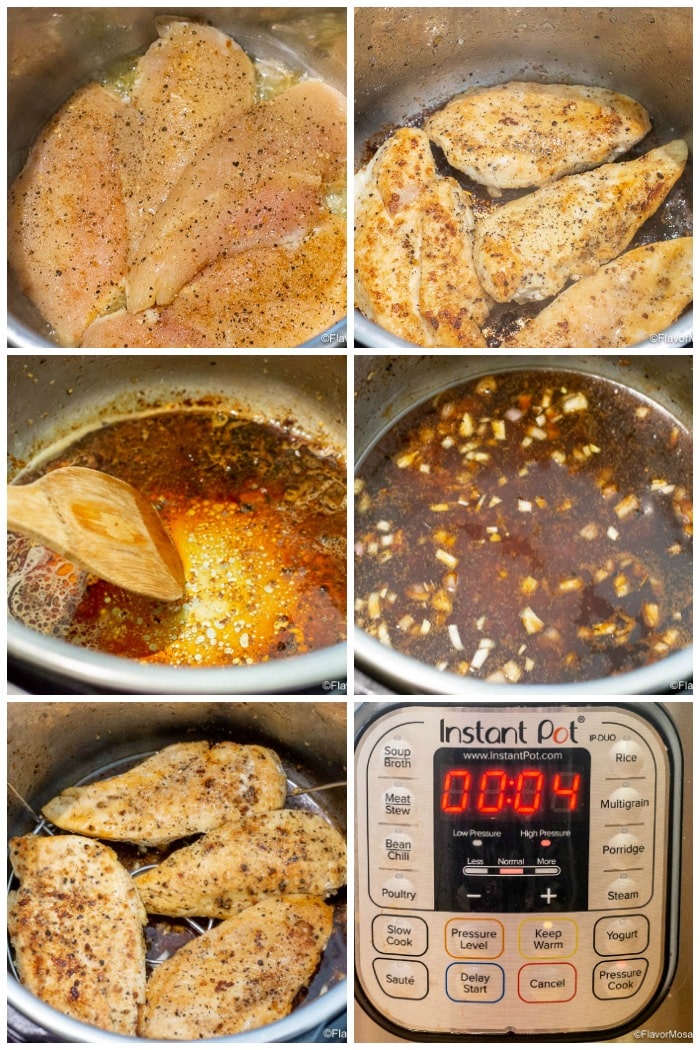
- Season and Brown Chicken. Season the chicken with salt, pepper or lemon pepper, garlic powder, and cayenne (optional). Use the Sauté function of the Instant Pot to brown the chicken in oil and butter. Scroll down to the printable recipe card for more detailed instructions.
- Saute Garlic and Shallots. Remove the chicken and add the minced garlic and shallots and cook for a couple of minutes.
- Deglaze. This is an IMPORTANT step. DO NOT SKIP. To deglaze the pot, pour a small amount of white wine and, using s wooden spatula, scrape the bottom of the pan to prevent the bits from sticking to the bottom of the pan. First, this will add more flavor to the sauce, and secondly, it will help to prevent receiving a “Burn” notice from the Instant Pot.
- Add Liquid. Pour in the chicken broth. If you don’t have chicken broth, you can use vegetable broth or water. The important thing is to have enough liquid for the Instant Pot to come to pressure. In addition, this liquid will serve as the base of the sauce to go on the chicken.
- Add Back The Chicken. Add the chicken back into the Inner Liner Pot with the liquid. I like to place the chicken on the trivet that came with the Instant Pot so the chicken is not sitting in the liquid, but sitting above it. However, you could leave out the trivet and add the chicken in so it is sitting in the liquid.
- Pressure Cook. Pressure cook using High Pressure for 4 minutes. Scroll down to the bottom of this article, just above the comments, for the printable recipe card with more details.
How Long Do I Pressure Cook Chicken Piccata?
- Pressure Cook the Chicken Piccata for 4 minutes. This assumes that chicken breasts are thinly sliced. If you are using thick chicken breasts, then it may double the pressure cooking time.
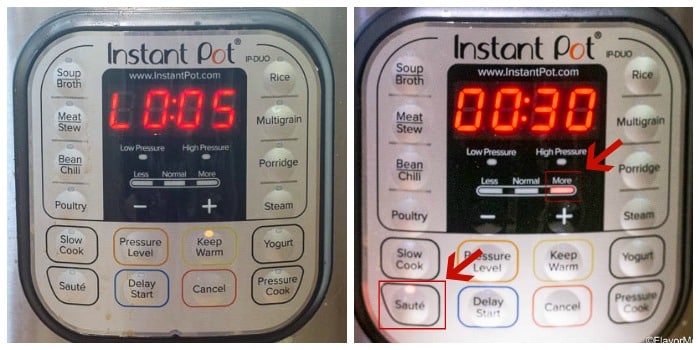
- Natural Release. Allow the Instant Pot to release pressure naturally for 5 minutes. (This means you do NOTHING for 5 minutes. Do NOT turn it off. Do NOT hit cancel. Do NOT move the pressure release valve. Literally, do NOTHING for 5 minutes.)
- Quick Release. After the 5-minute Natural Release, do a QUICK RELEASE by moving the pressure release valve to the VENTING position to allow the Instant Pot to release steam. This may take a minute or two.
How To Make The Buttery Garlic Lemon Caper Sauce
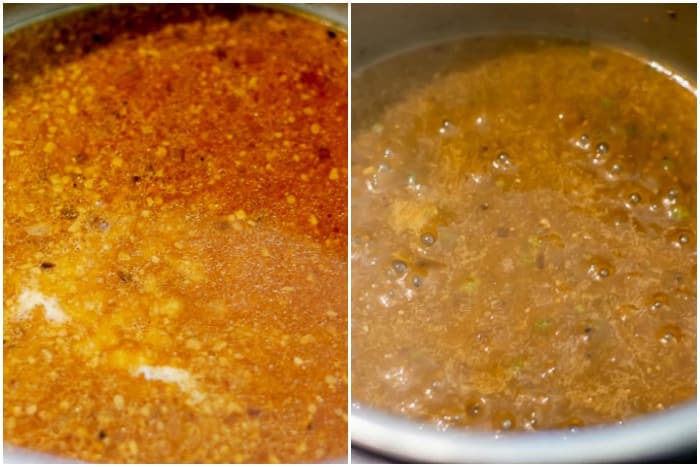
- Remove The Chicken Breasts. Press CANCEL open the lid, and remove the chicken breasts and set aside.
- Use Sauté Function. PRESS the SAUTE button to help heat and thicken the sauce.
- Add Capers. Drain the capers and add to the sauce. Stir until the capers are evenly distributed throughout the sauce.
- To Make The Sauce Creamy. Add a cup of heavy cream or milk and stir. This will make the sauce creamy.
- To Thicken The Sauce. In a small bowl stir together 2 tablespoons of cornstarch and 2 tablespoons of cold water. Stir until the cornstarch has dissolved. Pour into the sauce and stir. It may take a few minutes to thicken up.
Tips For Perfect Instant Pot Chicken Piccata Every Time
- Use Thin Sliced Chicken Breasts. I can’t stress this enough. It is important to use thinly sliced chicken breasts or chicken cutlets that are about 1/2 inch thick or less and not thick chicken breasts. The reason is that the thick chicken breasts will not cook as quickly and may double the pressure cooking time.
- DeGlaze the Pot. Do NOT skip this step. I understand that you may be in a hurry and may be tempted to skip this step. However, it is important to prevent getting a burn notice. That happens when food is burned on the bottom of the Instant pot. However, by adding liquid and scraping off bits off of the bottom of the pot, then this will help prevent that. However, another reason to do this step, is that it will add flavor to the chicken and sauce.
- Add Ingredients In Order Specified. As mentioned above, to prevent getting the Instant Pot Burn Message, add the ingredients in the order specified in the recipe. A thin liquid, such as broth or water, needs to be at the bottom of the pot when pressure cooking.
- Use A Trivet. Another way to avoid getting the Burn notice is to place the chicken breasts on a trivet just above the liquid. Since they are not sitting on the bottom of the pot, there is less risk that the bottom of the pot would burn. I also prefer the taste and texture of the chicken breast when it is on the trivet and is therefore steamed instead of boiled during pressure cooking.
- Add Cream and Cheese AFTER Pressure Cooking. Pressure cooking dairy products, such as milk or cream, can sometimes cause them to curdle. Therefore, it is a best practice to add these dairy items AFTER pressure cooking. The residual heat can heat the cream and melt the cheese. If necessary, you can use the SAUTE function to heat the dairy products and thicken the sauce.
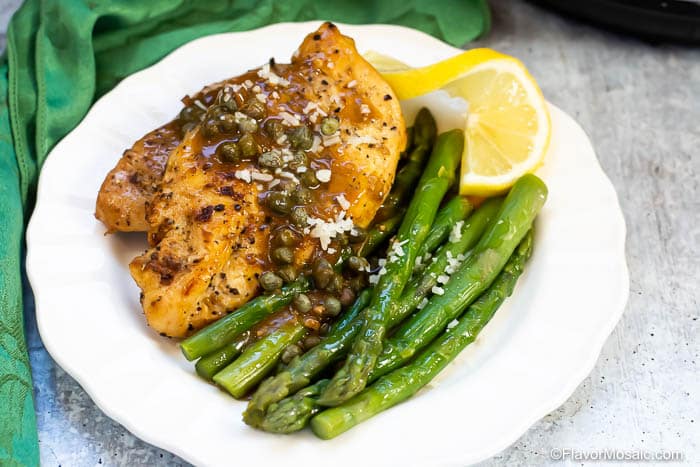
What To Serve With Chicken Piccata?
To round out your dinner, try these excellent salads and side dishes.
Salads
- Apple, Walnut, Cranberry Salad – A light, healthy, salad makes a delicious start to any meal.
- Spinach Strawberry Champagne Salad – This delicious green salad has baby spinach, fresh sliced strawberries, crumbled blue cheese, and chopped walnuts.
Soup
- Italian Wedding Soup – A light meatball vegetable soup with a flavorful broth.
Vegetable Side Dishes
- Bruschetta Roasted Asparagus – Asparagus with tomatoes, garlic, onions, and asiago cheese, makes a healthy, flavorful gourmet side dish.
- Roasted Brussels Sprouts With Bacon and Balsamic – Brussels sprouts roasted with bacon, onion, and a Balsamic Glaze adds incredible nutty, smoky flavor!
- Creole Green Beans – Savory and spicy and delicious, these Creole Green Beans with bacon, onions, tomatoes, chilies, and cajun seasoning are bursting with flavor.
- Instant Pot Sweet Potatoes – Make “baked” sweet potatoes in half the time by making them in the Instant Pot.
Rice Side Dishes
- Rice Pilaf – Fluffy, buttery, and fragrant, you won’t make rice pilaf any other way.
- Lemon Asparagus Brown Rice – glams up brown rice for a delicious, elegant yet easy side dish.
Pasta Side Dishes
- Instant Pot Macaroni And Cheese – A quick and easy, creamy and cheesy macaroni and cheese.
- Pea And Parsley Pesto Pasta – A delicious, quick and easy, budget friendly pasta side dish.
- Bacon Broccoli Tortellini Salad – A lightened up tortellini salad spruces up ordinary pasta salad.
FAQs
- Can I Freeze Chicken Piccata? Yes. Store in an air-tight freezer-safe container for up to 3 months.
- How Do I Make Chicken Piccata On The Stove? Use this Traditional Chicken Piccata recipe for the traditional cooking method on the stove.
- Is Chicken Piccata Gluten-Free? Traditional Chicken Piccata, dredged in flour, is not unless you use gluten-free flour. Since this recipe contains no flour, it should fit into a gluten-free diet. Just be sure to check the chicken broth to ensure that it is gluten-free.
- Is Chicken Piccata Dairy Free? If you leave out the cream and cheese, then it will be dairy-free.
- Is Chicken Piccata Low Carb? Since this recipe uses no flour, it is low carb. Serve with a green salad or non-starchy vegetable for a complete meal.
More Chicken Recipes
- Best Chicken Parmesan – This chicken parmesan is crispy on the outside, tender on the inside, and smothered with marinara and gooey, melted mozzarella!
- Low Carb Crack Slaw – Ground beef with Cole slaw for a delicious yet low carb dinner.
- Instant Pot Chicken And Wild Rice Soup – A hearty, comforting, and creamy chicken soup with wild rice and vegetables.
- Instant Pot Chicken Tortilla Soup – A simple homemade Mexican chicken soup.
- Instant Pot Chicken Tinga – Super easy Mexican shredded chicken that is perfect for tacos and tostadas.
- Instant Pot Chicken And Dumplings – An easy one-pot comfort food meal that can be ready in 30 minutes!
- Instant Pot Broccoli Cheese Chicken and Rice Casserole – A creamy cheesy comfort food made quick and easy in the Instant Pot.
If you like this recipe, be sure to follow us on:
Facebook | Twitter | Pinterest | Instagram
Recipe

Ingredients
Add BEFORE Pressure Cooking
- 1 tablespoon oil
- 1 tablespoon butter
- 4 thin-sliced boneless, skinless chicken breasts (half the thickness of regular chicken breast)
- 1/2 teaspoon each salt and pepper (or to taste)
- 1/2 teaspoon garlic powder
- 1/4 teaspoon cayenne (optional)
- 1/4 cup white wine
- 1/2 cup chicken broth
- 2 tablespoons fresh lemon juice (juice from 1 lemon)
- 1 tablespoon minced garlic (3 cloves of garlic)
- 1 tablespoon chopped shallots (optional)
Add AFTER Pressure Cooking
- 1/2 cup cream (or milk) (Optional)
- 1/4 cup grated parmesan cheese (Optional)
- 3.5 ounces capers (1 jar of capers, drained)
Optional Cornstarch Slurry
- 2 Tablespoons cornstarch
- 2 Tablespoons Water
Instructions
- Season Chicken. Season the 4 boneless, skinless, chicken breast cutlets with 1/2 teaspoon each of salt, pepper, and garlic powder. Optionally, sprinkle 1/4 teaspoon cayenne for a little heat. (Note: the cayenne will add spicy heat and will make the sauce a little more reddish brown in color.)
- Brown Chicken. Make sure the Instant Pot is plugged in. Press the SAUTE button until it says "More". Then wait a few minutes while it heats up. During this time, the display will say "On." When the Instant Pot is ready, it will show "Hot" on the display. Add 1 tablespoon oil and 1 tablespoon butter. When the butter is melted, add the 4 seasoned chicken breasts and cook on one side for 4 minutes or until that side has turned white and golden brown in some spots. Turn and cook for another 3 or 4 minutes on the other side until that side has browned. When finished, remove the chicken from the Instant Pot and place on a plate. Set aside.
- Saute Garlic and Shallots. Add the tablespoon of minced garlic and tablespoon of minced or chopped shallots and cook for 1 to 2 minutes.
- Deglaze the pot with white wine. Press CANCEL to cancel the Saute function. Pour in 1/4 cup white wine. Using a wooden spatula, scrape the bottom of the pot to ensure no bits of food are stuck to the bottom of the pot. (See note below regarding using a trivet.)
- Add Liquid. Pour in 1/2 cup of chicken broth and 2 Tablespoons of lemon juice and stir.
- Add Back Chicken. Add the browned chicken back in the pot. (See note below.)
- Pressure Cook 4 Minutes High Pressure. Press the MANUAL or PRESSURE COOK button (depending on model) and press HIGH PRESSURE. Then press the + or – sign to adjust the time to 4 minutes. Close and lock the lid. Move the Pressure Release valve to the SEALING position. (Note, it will take about 5 or 10 minutes to come up to pressure. During that time, the display will say "On." Once it comes up to pressure, it will start pressure cooking and the display will change to start counting down the time from 4 minutes. When it has finished pressure cooking, it will beep several times, and the display will start counting up from 0.)
- 5-Minute Natural Release. After the Instant Pot has finished pressure cooking and beeps several times, DO NOTHING for 5 minutes and allow the Instant Pot to release pressure naturally for 5 minutes. This means DO NOT TOUCH ANYTHING on the Instant Pot for 5 minutes.
- Quick Release. After the Instant Pot has released pressure naturally for 5 minutes and the display shows "L0:05" (See photo in blog post.), using a long handled spoon (to keep your hands away from the rising steam), move the Pressure Release Valve to the VENTING position to allow the pressure to release quickly. This may take a minute or two.
- Add Capers and Thicken The Sauce. Remove the lid and remove the chicken and place on a serving plate. Add the drained capers to the sauce. If you would like to thicken the sauce, make a cornstarch slurry by stirring together in a small bowl 2 tablespoons of cornstarch and 2 tablespoons of water. Stir until the cornstarch is dissolved. Then stir into the sauce. Wait a few minutes and the sauce should thicken.
- To Make The Sauce Creamy (Optional). Add 1/2 cup heavy cream or milk to the sauce and stir. If you like, you can also add 1/4 cup parmesan cheese and stir. Ladle the sauce over the chicken. Sprikle with parmesan cheese to garnish. Enjoy!
Video

Hi, I’m Michele Feuerborn, a home cook with 25+ years experience, and former AllRecipes Allstar, creating bold & easy Southern, Mexican, Tex-Mex, and Instant Pot recipes. Featured in publications like Parade and BuzzFeed. Read More…


Barbara says
Can I pound the chicken rather than slice before browning? Can I cut recipe in half and use same procedure?
Michele says
Hi Barbara, yes, you can pound the chicken thin and use in this recipe. You can reduce the number of chicken breasts and reduce the amount of seasoning you put on the chicken breasts. However, for the Instant Pot to function properly you need a certain amount of liquid. So I would recommend leaving the amount of the liquids the same (wine, broth, lemon juice) which may cause you to have extra sauce. I would recommend saving any extra sauce because it is really delicious, and you can use it on something else. I hope that helps.
Kim says
This is an easy delicious dish. I didn’t have shallots or heavy cream so substituted onion and half and half cream. I served risotto with the dish. This a repeat.
Michele says
Hi Kim,
Thanks for the nice comment. Excellent substitutions. I bet this would be delicious with risotto. I’m glad you liked it.
Thanks again,
Michele
Teresa Reynolds says
I’ve followed you on Pinterest. Your recipes are well balanced and teaching for new IP users. Like me. Thank you.
Michele says
Hi Teresa,
Thank you so much for following me and thank you for the kind words. I’m glad you enjoy our recipes.
Michele
Linda says
First recipe I made in my new IP- very, very helpful and explanatory. Came out great- thank you !
Michele says
Hi Linda,
That’s wonderful! I so glad you liked it! Welcome to the IP family. I’m honored that you chose one of my recipes as your first recipe. You are going to wonder what you ever did before you had an Instant Pot. Be sure to check out all our Instant Recipes. My first recipe for the IP was Instant Pot Beef Stew. It turned out so good. I was hooked from then on.
Michele
Dee says
I was looking for something different to make in my IP today and came across your Chicken Piccata! So fast, easy and flavorful. I doubled the ingredients for the sauce because my family loves sauce. Amazing!!
Michele says
Hi Dee,
Thanks for letting me know how much you and your family loved it! I’m so happy to hear that. Be sure to check out our other IP recipes as well.
Michele