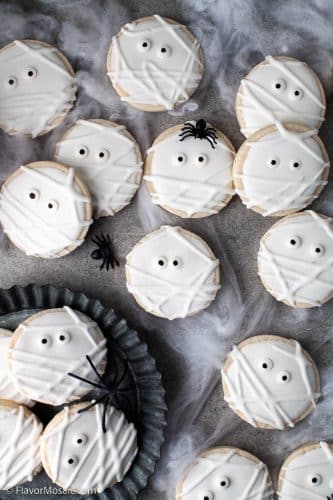
These Cute Mummy Cookies with candy eyes and mummy bandages are perfect for a Halloween Party and best of all are easy to make.
Whether served at a kid’s party or other fun Halloween parties, these Halloween sugar cookies are fun to make, fun to serve, and fun to eat!

It’s getting closer to that spooky time of year, and it’s good to start preparing those homemade Halloween Recipes so you can be ready for Halloween with Halloween treats. These homemade cut-out sugar cookies are the perfect Halloween treat.
Table of Contents

Why You’ll Love This Recipe
- Cute Cookies. I just love these Halloween Mummy Cookies. They are so darn spooky, I mean cute! They make a perfect Halloween festive treat.
- Freezable. You can freeze these Halloween cookies which means that you can make them ahead of time, which makes them perfect for planners.
- Customizable. You can decorate them however you like, and they can be fun for the kids to decorate for Halloween season. You’ll be amazed at how many different looks Mummy Cookies can have.
- Delicious. They are sugar cookies with royal icing, which means they are sweet and delicious!
- Well-Tested Recipe. You can trust this recipe to work because it has been well-tested, and taste-tested over the years.
How To Make Mummy cookies
Equipment
The affiliate links below will allow you to see the product on Amazon.com. If you purchase one of the items, I will receive a very small commission on the product, which does not increase the price.
- Round Cookie Cutter or Gingerbread man Cookie Cutter
- Stand Mixer or Hand Mixer
- Large Bowl or Medium Bowl
- Candy Eyeballs
- Cookie Sheet
- Rolling Pin
- Wire rack
Ingredients
Below, I discuss the ingredients and possible substitutions if you don’t have a specific ingredient. However, if you are looking for the specific measurements of each ingredient, scroll down to the bottom of this article, just above the comments, for the printable recipe card, which includes all the ingredients and the specific amounts of each one.

Cookie Recipe:
- Unsalted Butter. You’ll need softened unsalted real butter. I like to use unsalted butter because that gives me better control over the amount of salt.
- Powdered Sugar. You ‘ll powdered sugar, also called confectioner’s sugar.
- Eggs. You’ll need 2 small eggs for this recipe. It is important that they are small so you don’t add too much egg.
- Vanilla. You’ll need pure vanilla extract, if available. I don’t recommend using imitation vanilla. However, if pure vanilla is not an option, then go ahead and use imitation vanilla.
- Salt.
- Cornstarch.
- All-Purpose Flour.
Royal Icing:
- Powdered sugar
- Warm water
- Meringue Powder – If you can’t find Meringue powder at your local grocery store, you can order it from Amazon.
- Clear vanilla extract – You’ll also need a Clear Vanilla Extract so that the white mummy bandages stay white and don’t turn yellow.
Instructions
Make The Cookies

- Add Butter and Sugar in a stand mixer.
- Mix butter and sugar in a stand mixer fitted with a paddle attachment at medium speed until well combined and creamy.
- Add the eggs and vanilla and combine.
- Add flour, salt, and cornstarch in a separate bowl.
- Mix flour, salt, and cornstarch together.
- Add the flour mixture to the wet ingredients little by little. Mix at low speed until well combined. Make sure you clean the sides of the bowl, so it is all mixed.

- Extend the dough into a sheet that is 1/4” inch thick. Place it on a sheet of parchment paper or an acrylic sheet.
- Place the cookie dough in the refrigerator for 30 minutes.
- Preheat the oven to 350 degrees. Spray some non-stick spray on a baking sheet and set it aside.
- Cut the shapes and place them on a baking sheet.
- Bake for 12 to 15 minutes, or until the edges are golden.
- Let them cool for at least an hour. They must be completely cool before you add the icing.
Make The Royal Icing:

- In a stand mixer, whisk powdered sugar, flavor extract, water, and meringue powder until it’s fluffy and has peaks in it on medium to high speed. This could take anywhere from 4 to 5 minutes. (Photos 1 – 5 above.)
- Check the consistency of your icing. If it’s too thick add more water, very little at a time. (See Recipe Tips below.)
- Once you have the consistency you want, place it into a piping bag or you can also use a ziploc bag. If you are using a piping bag, seal it with a knot or with a rubber band.
- Cut a tiny edge of the bottom of the bag to use.
Decorate the Halloween Cookies:
Add Royal Icing Base And Eyes To Cookies

- Outline each cookie with your icing, and continue making a spiral inwards.
- Then immediately with a toothpick or a tool spread the icing evenly, smooth it out.
- Place the eyes on the cookie. Allow it to set before adding the lines.
- This consistency should allow you to fill in large areas of a cookie surface quickly. Repeat the step of adding it into a piping bag and finish all the cookies.
Add The Mummy Bandages

- Drizzle each cookie with a bit of icing to make it look like the mummy wrapping.
- Be careful not to cover the eyes.
- Serve and enjoy!

Recipe Tips
- Royal Icing Consistency – It is important to get the consistency of your icing right. If it’s too thick, you’ll need to add more water, very little at a time. For these cookies, you should have a medium consistency. It should take about 15 seconds to disappear. This should work for flooding the cookie, and details so it should not be runny, to make sure it does not fall through the sides. (Medium royal icing is slightly thinner than piping icing.)
Variations
- Store-bought Sugar Cookies – If you don’t feel like making sugar cookies from scratch, buy start with a simple sugar cookie pre-made at the grocery store bakery and then all you have to do is decorate it.
- Chocolate Mummy Cookies – To change things up, use chocolate cookies instead. Replace 1 cup of all-purpose flour with 1 cup of cocoa for the chocolate cookies.
- Mummy Nutter Butter. You can buy Nutter Butter Cookies to use as your base and then just follow the instructions to make the icing and decorate them.
- Mummy Gingerbread Man – Instead of using a round cookie cutter, use a gingerbread man shaped cookie cutter instead.
- Mummy Peanut Butter Cookies. Use your favorite peanut butter cookie recipe as a base, and then follow the directions to ice and decorate the cookies.

FAQs
Can You Freeze Cookies With Royal Icing?
Yes. You can freeze cookies with royal icing.
- Allow the royal icing to fully set before packaging for freezing.
- Place the cookies in airtight, freezer-safe bags or containers.
- Freeze for up to 3 months.
How Do I Store Mummy Cookies?
Before storing, make sure that the Mummy sugar cookies are completely cool and that the mummy bandages are completely set. You can store the cookies unfrosted in an airtight container in the refrigerator for up to 5 days. You can also store frosted cookies in an airtight container in the fridge for up to 5 days, but place a piece of parchment paper between cookies if you are going to stack the iced cookies on top of each other. Please note that the icing will harden in the refrigerator.

If you like this recipe or make this recipe, be sure to leave a comment, rate the recipe, and follow us on:
Facebook | Twitter | Pinterest | BlogLovin | Instagram
Recipe
Mummy Sugar Cookies
Ingredients
Cookie Recipe:
- 1 cup unsalted butter softened
- 1 cup powdered sugar
- 2 small eggs (It is important that they are small)
- 1 1/2 teaspoons vanilla extract
- ½ teaspoon salt
- ⅓ cup cornstarch
- 3 ½ cups flour
Royal Icing:
- 1 1/2 cups powdered sugar
- 2 1/4 Tablespoons warm water
- 1 Tablespoon Meringue Powder
- 1/4 teaspoon clear flavor extract
Instructions
Cookie Recipe
- Mix butter and sugar in a stand mixer fitted with a paddle attachment at medium speed until well combined and creamy.
- Add the eggs and vanilla and combine.
- Whisk flour, salt, and cornstarch together in a separate bowl.
- Add the flour mixture to the wet ingredients little by little. Mix at low speed until well combined. Make sure you clean the sides of the bowl, so it is all mixed.
- Extend the dough into a sheet that is 1/4” inch thick. Place it on a sheet of parchment paper or an acrylic sheet.
- Place the dough in the refrigerator for 30 minutes.
- Preheat the oven to 350 degrees. Spray some non-stick spray on a baking sheet and set it aside.
- Cut the shapes and place them on a baking sheet.
- Bake for 12 to 15 minutes, or until the edges are golden.
- Let them cool for at least an hour. They must be completely cool before you add the icing.
Royal Icing
- In a stand mixer, whisk powdered sugar, flavor extract, water, and meringue powder until it’s fluffy and has peaks in it on medium to high speed. This could take anywhere from 4 to 5 minutes.
- Check the consistency of your icing. If it’s too thick add more water, very little at a time. For these cookies, you should have a medium consistency. It should take about 15 seconds to disappear. This should work for flooding and details so it should not be runny, to make sure it does not fall through the sides. (Medium royal icing is slightly thinner than piping icing.)
- Once you have the consistency you want, place it into a piping bag or you can also use a ziploc bag. If you are using a piping bag, seal it with a knot or with a rubber band.
- Cut a tiny edge of the bottom of the bag to use.
Decorate The Cookies
- Outline each cookie with your icing, and continue making a spiral inwards. Then immediately with a toothpick or a tool spread the icing evenly, smooth it out, and place the eyes on the cookie. Allow it to set before adding the lines. This consistency should allow you to fill in large areas of a cookie surface quickly. Repeat the step of adding it into a piping bag and finish all the cookies.
- Continue with your icing and drizzle each cookie with a bit of icing to make it look like the mummy wrapping. Be careful not to cover the eyes.


Comments
No Comments