
This post may contain affiliate links. Please read our disclosure policy.
Imagine a buttery graham cracker crust, chewy coconut center, and a glossy chocolate top that snaps when you bite in-just like your favorite Mounds bars, only better!
After dozens of test batches and plenty of chocolatey taste tests, I've perfected this recipe so you get bakery-worthy bars every time. If you love easy, nostalgic treats with serious chocolate-coconut flavor with a graham cracker crust, these are for you.

Table of Contents
- 📍Recipe At A Glance
- Why I Love These Chocolate Coconut Bars 🥥🍫
- 🛒 Ingredient Notes & Substitutions
- Essential Tools & Equipment
- 👩🍳 Step-By-Step: How to Make Chocolate Coconut Bars
- Pro Tips for Perfect Bars
- Variations & Dietary Swaps
- What To Serve With Chocolate Coconut Bars
- Troubleshooting Common Issues
- ❓FAQs
- More Easy Dessert Bar Recipes
- Ready to Bake?
- 💬 Have you made these bars? Drop a comment and rating below!
- Recipe
- Reviews
📍Recipe At A Glance
| What | Details |
|---|---|
| Yield | 9 large bars (or 16 smaller) |
| Prep Time | 15 minutes |
| Cook Time | 25 minutes |
| Chill Time | 2 hours |
| Total Time | 2 hours, 40 minutes |
| Skill Level | Beginner-friendly |
| Make Ahead? | YES - best after chilling! |
| Freezer-Friendly | Absolutely |
| Diet | Vegetarian, can be dairy-free/vegan or gluten-free (see swaps) |
Why I Love These Chocolate Coconut Bars 🥥🍫
As a home cook and recipe developer with 20+ years in the kitchen, I'm picky about my chocolate-coconut treats! These bars are rich, chewy, crisp on the bottom, and deeply satisfying-no mixer needed, no complicated steps.
I wanted a bar that felt classic but with modern tweaks for flavor and flexibility. Whether you're baking for a holiday tray, a potluck, or just because, this is one recipe you can trust will deliver. (And yes, I tested it a lot-just ask my neighbors!)
🛒 Ingredient Notes & Substitutions
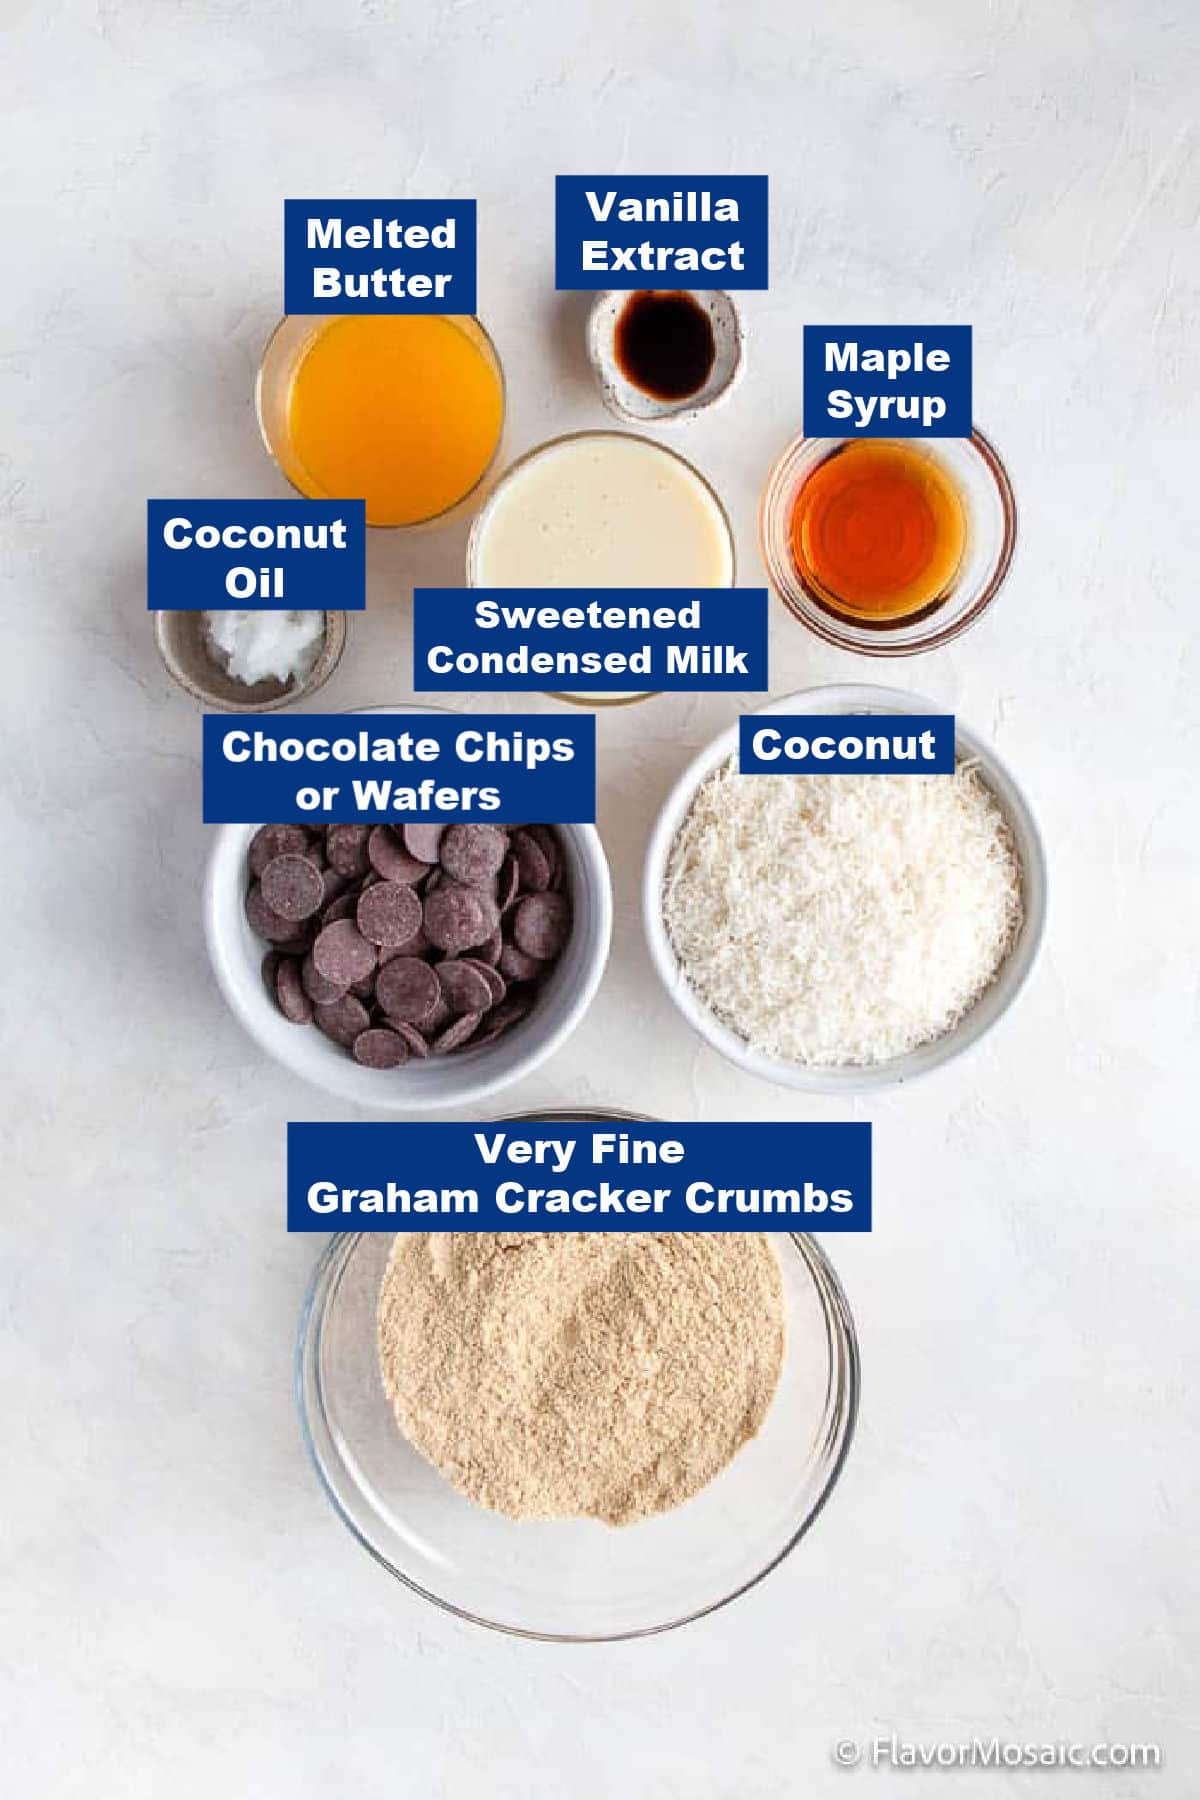
- Graham Cracker Crumbs
These make the crust sweet and crunchy-the perfect base for the coconut layer.- Why? Graham crackers give a buttery snap.
- Swap: Cinnamon grahams, vanilla wafers, or gluten-free cookies all work.
- Unsalted Butter
Adds richness and lets you control the salt.- Vegan/dairy-free? Use plant-based butter sticks or good-quality margarine.
- Sweetened Condensed Milk
The magic ingredient for that signature chewy coconut center. (Evaporated milk won't work.)- Dairy-free? Use sweetened condensed coconut milk-works beautifully!
- Unsweetened Shredded Coconut
Lets you control sweetness and gives the bars their signature chew.- Why unsweetened? Prevents the bars from becoming overly sweet, balancing the condensed milk and chocolate. You can toast it for extra flavor.
- Maple Syrup
Adds moisture and subtle depth.- Swap: Honey or agave syrup.
- Vanilla Extract
Rounds out all the flavors. - Semi-Sweet Chocolate Chips
Classic, easy to melt, and always on hand.- Why chips? They're convenient, but for a silkier finish, try chocolate wafers or Ghirardelli melts (no extra oil needed).
- Coconut Oil
Thins chocolate for a glossy finish and easier spreading.- Swap: Vegetable or canola oil.
See the recipe card below for exact measurements and steps.
Essential Tools & Equipment
- 9×9-inch baking pan (metal or glass)
- Parchment paper (for easy removal)
- Mixing bowls & spoon
- Heatproof spatula or offset knife (especially for spreading chocolate)
- Microwave-safe bowl (for melting chocolate)
👩🍳 Step-By-Step: How to Make Chocolate Coconut Bars
1. Make the Crust
Preheat oven to 350°F.
Mix graham cracker crumbs, melted butter, and a pinch of salt. Press firmly into a lined pan.
Bake 8-10 minutes, until golden. Cool completely.
Why press firmly? A packed crust holds up under the soft coconut layer.

2. Make the Coconut Layer
Mix coconut, sweetened condensed milk, maple syrup, and vanilla in a bowl.
Don't overmix-keeps the coconut's texture.
Spread gently over cooled crust.
Bake 15 minutes, until the edges are golden and crisp.
Why not overbake? The center will firm up as it cools, keeping the bars chewy.

3. Make the Chocolate Topping
Once bars are completely cool, melt chocolate chips and coconut oil in a microwave-safe bowl (30-second intervals, stir each time).
Spread evenly over the coconut layer with a heatproof spatula.
Refrigerate for at least 2 hours for cleanest slices and glossy finish.
In a hurry? Set at room temp for 1 hour, but the fridge is best.

Pro Tips for Perfect Bars
- Use high-quality chocolate for best flavor and a shiny top.
- Microwave chocolate carefully in short bursts to prevent burning.
- Chocolate too thick? Stir in extra coconut oil for easier spreading.
- Decorate with sprinkles or toasted coconut while the chocolate is still wet.
- Chill fully for sharp, neat layers and easy slicing.
Variations & Dietary Swaps
- Dairy-Free/Vegan: Use plant-based butter sticks and sweetened condensed coconut milk.
- Gluten-Free: Swap in gluten-free graham crackers or cookies.
- Less Sugar: Use unsweetened coconut and reduce maple syrup (don't skip the sweetened condensed milk-structure depends on it; taste and texture will be altered).
- Dark Chocolate: Swap in dark chips for bolder flavor.
- Peanut Butter Swirl: Add 2-3 tbsp peanut butter to melted chocolate before spreading.
- Toasted Coconut Topping: Sprinkle over wet chocolate for crunch.

What To Serve With Chocolate Coconut Bars
- With a scoop of vanilla ice cream (try slightly warmed bars!)
- On a cookie or dessert board for parties
- As a lunchbox or potluck treat-they travel well
Troubleshooting Common Issues
- Chocolate seized or clumpy? Add a bit more coconut oil and stir gently. Avoid overheating.
If it's truly seized (hard and crumbly), it's often beyond saving for a smooth topping-use it as chocolate bark or melt into hot cocoa. - Crumbly crust? Be sure you pressed it firmly and used enough melted butter.
- Coconut layer runny? Make sure you're using shredded, unsweetened coconut (not moist, flaked).

❓FAQs
Yes for chocolate chips-oil helps make a smooth, glossy finish. Wafers/candy melts usually don't need it.
Airtight container in the fridge, 3-4 days. For longer storage, freeze individually wrapped bars for up to 3 months.
Absolutely! Bars taste even better after a day in the fridge.
Yes. Slice, wrap tightly, and freeze up to 3 months. Thaw in fridge or at room temp.
More Easy Dessert Bar Recipes
- Peanut Butter Pie Brownies – A brownie layer topped with a sweet, creamy peanut butter layer and drizzled with melted chocolate.
- Sopapilla Cheesecake Bars – AKA Churro Cheesecake Bars, with a creamy cheesecake filling nestled between two crescent dough sheets.
- Butterfinger Buckeye Brownies – Brownies topped with a sweet peanut butter layer and butterfinger bits, and topped with a chocolate ganache with more butterfinger bits.
- Chocolate Cherry Brownies – Sweet chocolate brownies with tart cherries.

Ready to Bake?
If you make these, leave a comment below or tag @FlavorMosaic on Instagram-I'd love to see your creations!
💬 Have you made these bars? Drop a comment and rating below!
Your feedback helps me (and other readers) bake with confidence.
Recipe
Chocolate Coconut Bars Recipe

Ingredients
- 2 cups graham cracker crumbs
- 1/2 cup melted butter
- 1 (14-oz can) Sweetened Condensed Milk (Dairy-free? Use sweetened condensed coconut milk)
- 3 cups unsweetened shredded dried coconut
- 2-1/2 Tablespoons maple syrup
- 1 teaspoon vanilla extract
- 1/2 Tablespoons coconut oil
- 1 Cup semi-sweet chocolate chips
Instructions
- Preheat oven to 350°F. Line a 9×9-inch pan with parchment.
- Mix graham crumbs, melted butter, and a pinch of salt. Press into pan. Bake 8-10 min until golden. Cool.
- In a bowl, combine coconut, condensed milk, maple syrup, and vanilla. Don't overmix. Spread over crust. Bake 15 min until coconut edges are golden. Cool completely.
- Melt chocolate chips and coconut oil in the microwave in 30-second intervals, stirring each time. Spread over coconut layer.
- Chill in fridge for 2 hours before slicing for the cleanest layers.
Video

Hi, I’m Michele Feuerborn, a home cook with 25+ years experience, and former AllRecipes Allstar, creating bold & easy Southern, Mexican, Tex-Mex, and Instant Pot recipes. Featured in publications like Parade and BuzzFeed. Read More…
Elaine says
Fantastic snack! I love how delicious these bars look – exactly the way I like to make mine!
Priya Srinivasan says
Oh my god these chocolate coconut bars look totally tempting! My boys would totally love this one! A great snack anytime!
Casey says
Made these yesterday and the coconut filling is to die for!!!! SO GOOD!
Beth Sachs says
oh wow, these chocolate coconut bars look incredible. I’ll be giving these a try at the weekend!
Emily says
These chocolate coconut bars are divine! I love the melted chocolate layer on top!