


This post may contain affiliate links. Please read our disclosure policy.
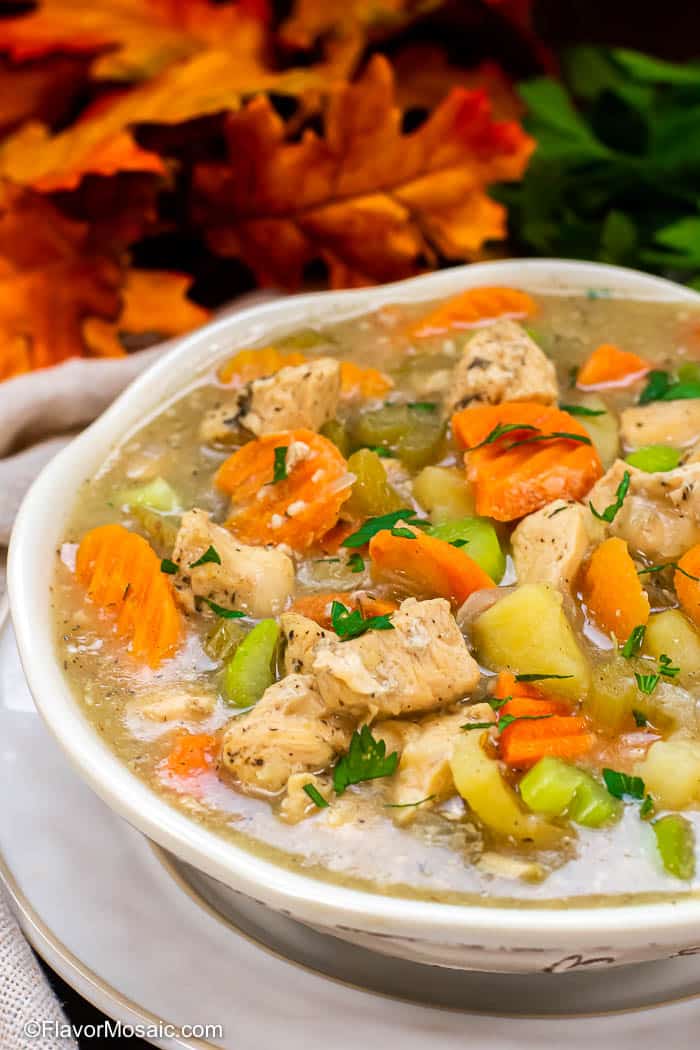
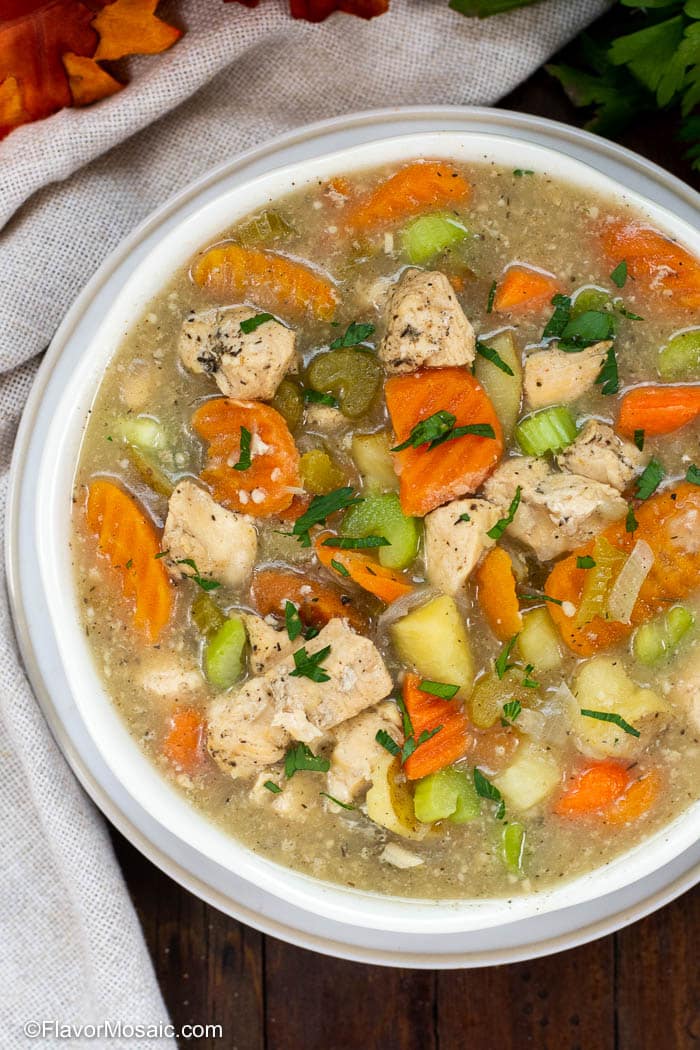
This easy Instant Pot Chicken Stew is a hearty, delicious comfort food that is an easy, dump and go, set it and forget it, 30-minute Instant Pot recipe with pieces of tender chicken, carrots and potatoes with herbs and seasoning.
If you don’t have all day to wait for chicken stew in the slow cooker, then make the chicken stew in the Instant Pot. Serve with crusty bread, and this hearty stew makes a delicious meal that your whole family will love.
Instant Pot Chicken Stew
This recipe is one of those that is so simple, yet so flavorful and delicious that it makes the best comfort food. With chunks of chicken breast, carrots, celery, and potatoes with lots of herbs and seasoning, such as rosemary, thyme, sage, and more, this is sure to become a family favorite.
This Pressure Cooker Chicken Stew is certain to become one of your favorite Instant Pot Recipes and maybe even one of your favorite Chicken Recipes.
In addition, it makes a very hearty yet budget-friendly one-pot meal that will easily feed a family of 4 people.
Table of Contents
- Instant Pot Chicken Stew
- Why make Chicken Stew in an Instant Pot?
- Why Make This Instant Pot Chicken Stew Recipe?
- How To Make Instant Pot Chicken Stew
- How Long Does It Take To Make Chicken Stew In An Instant Pot
- Tips For Perfect Instant Pot Chicken Stew
- Variations of Chicken Stew
- Frequently Asked Questions
- What To Serve With Chicken Stew
- More Instant Pot Soups and Stews
- Recipe
- Reviews
Why make Chicken Stew in an Instant Pot?
- Ready in 30 minutes – The Chicken Stew will be ready in about 30 minutes using the Instant Pot.
- One-Pot Meal – It makes an easy dump and go – set it and forget it recipe that can be made entirely in an Instant Pot, which saves time on clean up.
- Flavorful – Cooking under pressure really brings out the flavors. Even though it only takes about 30 minutes, it will taste as if it simmered for hours.
Why Make This Instant Pot Chicken Stew Recipe?
- Delicious Recipe – This is an easy, delicious recipe the whole family will love!
- Detailed Instructions – Instructions are easy to understand and easy to follow, even for people who are new Instant Pot users.
- Step By Step Photos – In addition to written instructions, step by step photos are provided to help you visualize each step of the process.
- Cooking Tips – Included in this blog post are cooking tips to help you make this recipe perfectly every time.
- Instant Pot Tips – Included in this blog post, are tips for Instant Pot cooking that will help you be successful in making this recipe in the Instant Pot.
- Recipe Variation Ideas – If you like to change things up, I have included ideas for variations on the basic recipe.
- Serving Suggestions – In addition to the recipe, I include suggestions for what to serve with the recipe.
- Frequently Asked Questions – Get your frequently asked questions answered before you make the recipe without having to guess, or to email back and forth to try to get the answer.
What Do I Need To Make This Recipe
Equipment
Below are links to tools that are used in making this recipe. I have included affiliate links to Amazon.com that allow you to visualize the tool, and if you choose to purchase one, I receive a small commission at no additional cost to you.
- 6-quart Instant Pot Duo60 from Amazon.com (affiliate link) - This is the model Instant Pot that I use.
- Chef's Knife from Amazon.com (affiliate link)
- Slotted Spoon on Amazon.com (affiliate link)
- Ladle on Amazon.com (affiliate link)

Ingredients
You will need the following ingredients, and/or substitutions where available, to make this recipe. For a complete list of ingredients, with the specified amounts for each one, scroll down to the bottom of this post, just above the comments, for the printable recipe card. That will include all the information you need to make this recipe.
- Oil – You’ll need oil like olive oil or avocado oil if you wish to brown the chicken first before cooking.
- Liquid – You will need at least 2 cups of water or chicken broth, chicken stock, or vegetable broth to make this recipe in the Instant Pot. I like to use low sodium chicken broth because then you can better control the amount of salt in the recipe.
- Chicken – You can use either boneless skinless chicken breasts or chicken thighs. Either one is fine as long as they are boneless and skinless.
- Potatoes – I cut some russet potatoes to add to the chicken stew. However, you could use baby potatoes, or sweet potatoes if you wish.
- Vegetables – You will need onions, celery, carrots, and garlic. If you choose to substitute one of these vegetables, it could change the cooking time. The specified vegetables usually hold up well while the chicken is pressure cooked. If you change it to spinach, green beans, or broccoli, you may want to add those vegetables after pressure cooking.
- Seasoning – This is where you will have the most flexibility in making changes. I used salt, pepper, and fresh herbs like thyme, rosemary, and then poultry seasoning, ground sage, and a touch of cayenne. Other common seasonings you could add, if you wanted to customize the recipe, might be to add a bay leaf or a couple of bay leaves, paprika, or chili powder, or something like that.
- Cornstarch Slurry – made with water and cornstarch, this is used to thicken the stew after it has been pressure cooked.
- Chopped parsley (optional) – Just before serving, add a little chopped fresh parsley on top of each bowl for garnish. This is optional. If you don’t have any parsley, you could also use chopped green onions or chopped cilantro. They just add a little green color to make a nice presentation.
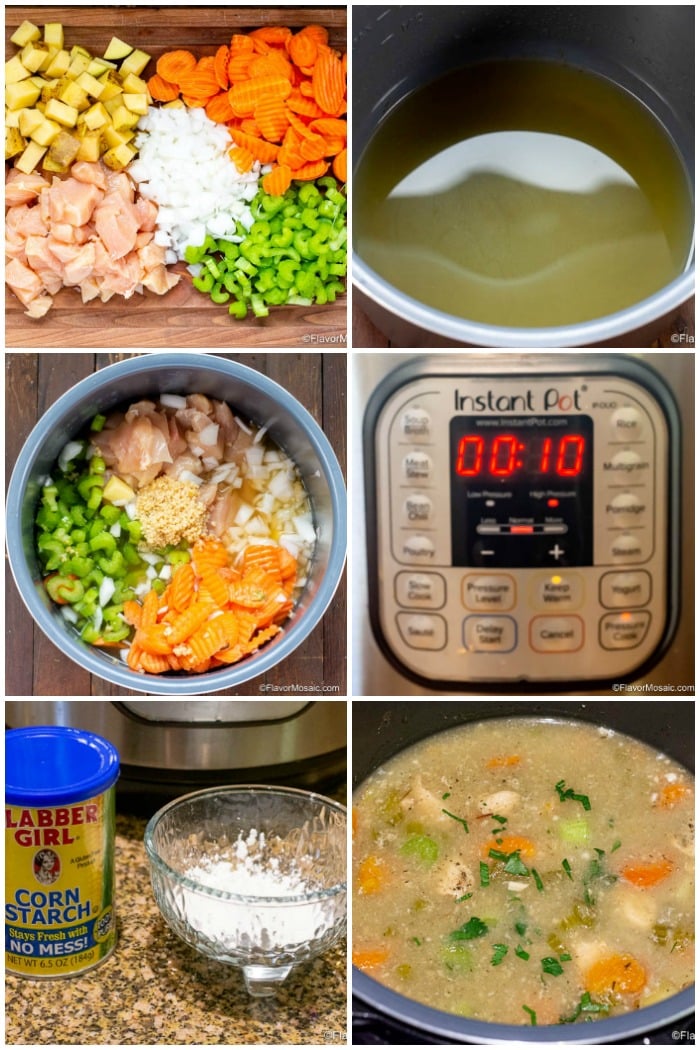
How To Make Instant Pot Chicken Stew
I’m including high-level instructions here for a quick reference. For the more detailed step by step instructions, scroll down to the bottom of this blog post, just above the comments, for the printable recipe card.
- Add the chicken broth and then all of the rest of the ingredients to the Inner Liner pot of the Instant Pot.
- Place the Inner Liner pot into the Instant Pot.
- PRESSURE COOK for 10 minutes using HIGH PRESSURE.
- After it has finished pressure cooking for 10 minutes, do a 10-minute NATURAL RELEASE followed by a QUICK RELEASE.
- Use the SAUTE function to heat and thicken the stew.
How Long Does It Take To Make Chicken Stew In An Instant Pot
An Instant Pot requires some time to come up to pressure before it starts pressure cooking. Think of this like preheating the oven. Then after pressure cooking, it will take some time to bring the pressure back down. Then you will use the sauté function to thicken the soup. Below is a breakdown of the time required and estimates of the pressurization times. My estimates are based on my testing of this recipe, as written in the recipe card below, using a 6-quart Instant Pot Duo model.
- Come Up To Pressure – 10 minutes
- Pressure Cook – 10 minutes high pressure
- Natural Release – 10 minutes
- Saute – 5 minutes
- Total Time – 35 minutes *
* Times may vary depending on the ingredients used, such as frozen chicken, the model of the Instant Pot, or the amount of ingredients, such as if you double the recipe.
Tips For Perfect Instant Pot Chicken Stew
- Why Do you Add the Ingredients In The Inner Liner Pot Before Placing the Pot inside the Instant Pot?
- I have read from multiple people how they started adding ingredients, including the liquid, in the Instant Pot, only to realize that they did not have the Inner Liner pot inside the Instant Pot before doing that. In this instance, they MAY have ruined their Instant Pot. That is why I recommend adding the ingredients into the Inner Liner Pot first and then placing the Inner Liner Pot that contains the ingredients inside the Instant Pot.
- Why Natural Release instead of a Quick Release?
- InstantPot.com recommends using a natural release for soups and poultry and quick release for vegetables. Since the stew continues to cook during the natural release, I pressure cook for 10 minutes and then let it release pressure naturally for 10 minutes, but then do a quick release to prevent the vegetables from overcooking and turning to mush.
- Why add liquid first?
- According to InstantPot.com, one of the ways to prevent food for sticking to the bottom of the instant pot and burning, and to prevent receiving a “Burn” message, add the liquid first and then add other ingredients.
- Why Is The Order of Ingredients Important?
- Yes. InstantPot.com calls this layering ingredients. Add the liquid to the bottom and then layer the ingredients on top and DO NOT STIR. This helps to prevent foods that might scorch from sticking to the bottom of the pot.
- How To Thicken Chicken Stew?
- Pressure cooking requires liquid to come to pressure. Sometimes, immediately after opening the Instant Pto after pressure cooking, it may appear too liquidy.
- To thicken the stew, make a cornstarch slurry, by mixing together in a small bowl, 2 tablespoons each of cornstarch and water. Stir until the cornstarch dissolves into the water. Then add to the chicken stew after pressure cooking, and then press saute and stir the chicken stew, and wait about 5 minutes to allow it to thicken.
- A second option to thicken the stew after pressure cooking is to remove 2 cups of the chicken and vegetables with broth and either use an immersion blender or food processor or blender to puree the mixture and then add that back into the Instant Pot with the rest of the chicken stew.

Variations of Chicken Stew
- Green Chili Chicken Stew – To make a spicier version, add a small can of diced green chilies to this recipe to turn it into Green Chili Chicken Stew.
- Chicken and Chorizo Stew – To make a different spicier version, sauté a half-pound of chorizo, and then add the other ingredients and add a can of diced tomatoes and chilies as well.
- Chipotle Chicken Stew – Add some chipotle peppers in adobo sauce, 1 to 2 peppers, depending on how spicy you like it, as well as a teaspoon of ground cumin.
Frequently Asked Questions
- Can I Make This Recipe With Frozen Chicken?
- Yes. Just add the frozen chicken after the liquid with the other ingredients. Instead of cooking for 10 minutes, cook for 12 minutes.
- Can I Make This Ahead of Time?
- Yes. You can make it ahead of time and reheat it in the Instant Pot by pressure cooking it on high pressure for “0” minutes. If you want to heat individual servings, you can heat individual servings in the microwave for about 3 minutes.
- How Do I store leftover Chicken Stew?
- Store in an airtight container and refrigerate for up to 3 days until you are ready to serve.
- Can I Freeze Chicken Stew?
- Yes. Place in a freezer-safe container and freeze it for up to 3 months.
What To Serve With Chicken Stew
- A Green Salad, such as my Apple Walnut Cranberry Salad.
- Homemade Buttermilk Biscuits, or Cornbread.
More Instant Pot Soups and Stews
- Instant Pot Chicken Noodle Soup
- Instant Pot Chicken And Dumplings
- Instant Pot Chicken And Wild Rice Soup
- Instant Pot Beef Stew
- Instant Pot Sausage Tortellini Soup
If you like this recipe, be sure to follow us on:
Facebook | Twitter | Pinterest | Instagram
Recipe

Ingredients
Liquid
- 2-1/2 cups low sodium chicken broth
Chicken
- 1 pound boneless, skinless chicken breast or thighs, cubed
Vegetables
- 1 onion, chopped
- 3 stalks celery, chopped
- 1 cup sliced carrots
- 1 tablespoon minced garlic (about 3 cloves)
- 2 potatoes, cut into bite-sized cubes
Seasoning
- 1/2 teaspoon each salt and pepper
- 1/2 teaspoon dried thyme
- 1/2 teaspoon dried rosemary
- 1/2 teaspoon poultry seasoning
- 1/2 teaspoon ground sage
- 1/2 teaspoon cayenne (optional)
Cornstarch Slurry (After Pressure Cooking)
- 2 tablespoons water
- 2 tablespoons cornstarch
Garnish
- 2 tablespoons chopped parsley
Instructions
Add The Ingredients
- Pour the chicken broth (or water) into the Inner Liner Pot of the Instant Pot.
- Add the chicken breasts and then all of the rest of the ingredients to the Inner Liner pot. Place the Inner Liner Pot, containing all the ingredients, in the Instant Pot.
Press Cook
- Press the PRESSURE COOK button (or MANUAL button depending on model) and select HIGH PRESSURE and use the + or – buttons to set the time to 10 minutes.
Pressure Release
- Close and lock the lid. Move the Pressure Release Valve to the SEALING position. (NOTE: It will take some time, maybe 10 to 20 minutes, for the Instant Pot to come up to pressure before it starts to count down the 10 minutes Pressure Cook time. During this time the diplay will show "On." Once it starts pressure cooking it will display 10 minutes and start counting down.)
- After it has finished pressure cooking for 10 minutes, it will beep 10 times. Then it will display L00:00 and start counting upward. Do NOTHING for 10 minutes. This is the 10-minute NATURAL RELEASE. After it has released pressure naturally for 10 minutes, do a QUICK RELEASE by carefully moving the pressure release valve to the VENTING position.
Thicken Soup
- Use Saute Function. After the Instant Pot has finished releasing pressure completely and the pin has dropped, remove the lid, press CANCEL and then press the SAUTE button and press More to continue heating the soup.
- Make the Cornstarch Slurry. In a small bowl, stir together 2 tablespoons of water and 2 tablespoons of cornstarch and stir until the cornstarch is dissolved. Pour the the cornstarch slurry into the chicken stew and stir until the stew thickens. Garnish with chopped parsley just before serving.
Video

Hi, I’m Michele Feuerborn, a home cook with 25+ years experience, and former AllRecipes Allstar, creating bold & easy Southern, Mexican, Tex-Mex, and Instant Pot recipes. Featured in publications like Parade and BuzzFeed. Read More…


Aileen says
My daughter came home from for Spring Break and loves the chicken stew. I had prepared ahead of time and had in the freezer. It’s a great meal to have ready in a few minutes. She asked me to make more before she goes back to school.
Michele says
I’m so glad you and your daughter like it! Be sure to share the blog link on social media with your friends.
Leslie says
This was dinner tonight. I think the recipe has great potential but I picked up the wrong measuring spoon for the cayenne and 1 t of it was wwwaaaaaaaayyyyyy to much!!! Will make again likely without the cayenne! Thanks for what I think is going to be a great recipe (sans cayenne!)
Todd says
I made this for dinner tonight because I had a pack of chicken tenders and wanted to find an interesting way to use them in the Instant Pot. Thus, when I saw the rating for this recipe on Yummly, I couldn’t pass it up. It was awesome, and in fact, thick enough without the cornstarch slurry added because the chicken and potatoes shredded enough already! Thanks for this recipe, Michele! It’s a keeper and perfect for these cold winter nights!
Michele says
Hi Todd,
I’m glad you liked it. Thanks for letting us know.
Michele
Jyma says
This is great! I added a little curry powder and skipped the celery to add some spinach after I opened the pot. Thanks for the tip to prevent the burn message. I use the trivet too to help with that